Monday, November 29, 2010
Sunday, October 24, 2010
PARSHAT BERESHIT
CREATION WHEEL
Bereshit is obviously a great parsha for crafting but it seems to get lost in the shuffle of the end of all the chagim. After making Sukkot decorations and Simchat Torah flags, I don't usually have energy or time left for Bereshit. So, we finally got around doing my Bereshit craft this week (even though it was Parshat Vayera!)
I knew I wanted to do a Creation Wheel. I must have seen such a thing at some point in my life because the image was stuck in my head. I found that you could BUY a creation wheel craft at Oriental Trading (that place has EVERYTHING!) but why buy when you can make???
I have been saving cereal boxes because they make great cardboard for all sorts of crafts. For this craft, I just needed a cereal box, paper, glue, markers, and a paper fastener. I had never bought or used a paper fastener before but I knew that they were great for all sorts of projects and that I had to get them in my stash. The only problem is that I had NO IDEA how to say "paper fastener" in Hebrew! Thank G-d for google images. I printed out an image of a paper fastener and brought it to the craft store, yes I did. I showed the guy the picture, told him that it was what I needed and asked him how to say it in Hebrew. Get this - he knew exactly where they were in the store but he couldn't remember how to say it in Hebrew! So, I didn't feel so stupid. A box of paper fasteners in hand, I went home to experiment with a model.

I just cut out two circles from the cereal box (using pot covers to trace). Then, I had to figure out how to equally divide the circle into 7 sections for the 7 days of the week. Here, I got stuck. I needed some kind of geometry compass thing. Or, at least Andy. Since I didn't have either of those, I divided the circle into 8 equal sections instead - much easier - and decided I would live with one extra section (no perfectionism allowed).
I used whatever stickers and paper we had at home to create images for each day.
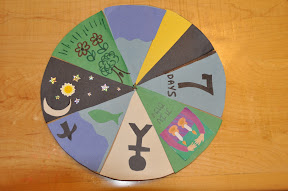
Then, I cut out a piece from the top circle, covered it with paper, decorated it and attached it with the paper fastener so that it could spin to reveal each day.
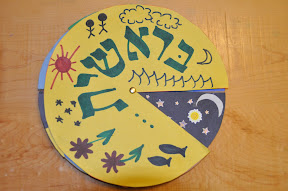
Somehow, even with all of my measuring, the wheel was not perfect but it was fine, fine, fine. To keep and use it long-term, I would definitely suggest getting it laminated.
There are pros and cons to having an example project for the girls to see. Pros - they understand what we are trying to make and they get excited to try make their own. Con - it definitely limits their creativity somewhat. Maya really wanted her "triangles" to look just like mine, even though I encouraged her to design them however she wanted.
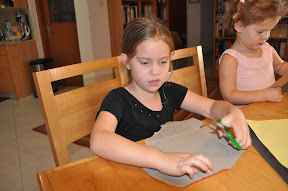
Maya was pretty much able to cut the circles by herself although the cardboard is a bit thick for kids' scissors:
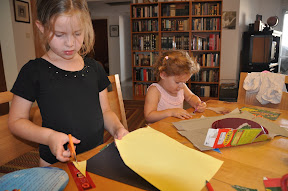
Yes, they are both wearing ballet outfits. No, they do not go to ballet class. Here is Maya's work in progress:
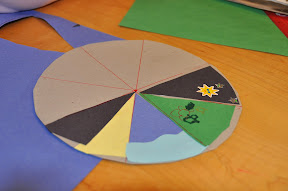


I was thoroughly surprised and impressed by her new ability to draw a dog! They probably most enjoyed using the star stickers (leftover from Lech Lecha) as earrings:
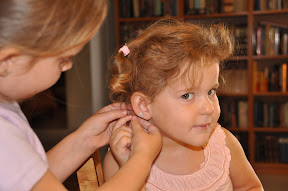
Maya really loved spinning her final project and going through the days while singing one of our favorite songs "Seven Days" originally recorded by Peter and Ellen Allard and recently recorded by Elana Jagoda
Shabbat Shalom!
Bereshit is obviously a great parsha for crafting but it seems to get lost in the shuffle of the end of all the chagim. After making Sukkot decorations and Simchat Torah flags, I don't usually have energy or time left for Bereshit. So, we finally got around doing my Bereshit craft this week (even though it was Parshat Vayera!)
I knew I wanted to do a Creation Wheel. I must have seen such a thing at some point in my life because the image was stuck in my head. I found that you could BUY a creation wheel craft at Oriental Trading (that place has EVERYTHING!) but why buy when you can make???
I have been saving cereal boxes because they make great cardboard for all sorts of crafts. For this craft, I just needed a cereal box, paper, glue, markers, and a paper fastener. I had never bought or used a paper fastener before but I knew that they were great for all sorts of projects and that I had to get them in my stash. The only problem is that I had NO IDEA how to say "paper fastener" in Hebrew! Thank G-d for google images. I printed out an image of a paper fastener and brought it to the craft store, yes I did. I showed the guy the picture, told him that it was what I needed and asked him how to say it in Hebrew. Get this - he knew exactly where they were in the store but he couldn't remember how to say it in Hebrew! So, I didn't feel so stupid. A box of paper fasteners in hand, I went home to experiment with a model.

I just cut out two circles from the cereal box (using pot covers to trace). Then, I had to figure out how to equally divide the circle into 7 sections for the 7 days of the week. Here, I got stuck. I needed some kind of geometry compass thing. Or, at least Andy. Since I didn't have either of those, I divided the circle into 8 equal sections instead - much easier - and decided I would live with one extra section (no perfectionism allowed).
I used whatever stickers and paper we had at home to create images for each day.
Then, I cut out a piece from the top circle, covered it with paper, decorated it and attached it with the paper fastener so that it could spin to reveal each day.
Somehow, even with all of my measuring, the wheel was not perfect but it was fine, fine, fine. To keep and use it long-term, I would definitely suggest getting it laminated.
There are pros and cons to having an example project for the girls to see. Pros - they understand what we are trying to make and they get excited to try make their own. Con - it definitely limits their creativity somewhat. Maya really wanted her "triangles" to look just like mine, even though I encouraged her to design them however she wanted.
Maya was pretty much able to cut the circles by herself although the cardboard is a bit thick for kids' scissors:
Yes, they are both wearing ballet outfits. No, they do not go to ballet class. Here is Maya's work in progress:
I was thoroughly surprised and impressed by her new ability to draw a dog! They probably most enjoyed using the star stickers (leftover from Lech Lecha) as earrings:
Maya really loved spinning her final project and going through the days while singing one of our favorite songs "Seven Days" originally recorded by Peter and Ellen Allard and recently recorded by Elana Jagoda
Shabbat Shalom!
Thursday, October 21, 2010
PARSHAT VAYERA 2
WELCOME MAT
Of course, we brought our Parsha Welcome Mat to Israel with us but it is too big for us to use for our front door. Instead, it has found a home at the foot of our kitchen sink. So, we had to make a new one for this week's parsha:
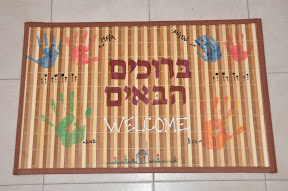
Of course, we brought our Parsha Welcome Mat to Israel with us but it is too big for us to use for our front door. Instead, it has found a home at the foot of our kitchen sink. So, we had to make a new one for this week's parsha:
PARSHAT LECH LECHA 2
FOOTPRINTS AND STAR GLOBE
Parshat Lech Lecha "take two".
Encountering the parshiot for a second time, I wasn't sure if I would just do the same projects again with the girls (which they would be perfectly fine with) or if I would "challenge" myself to go bigger and better. I still don't really know but I was motivated to come up with some new ideas for Parshat Lech Lecha.
Parshat Lech Lecha is particularly significant for us this year since it is our first living as a family in Israel. We have done "Lech Lecha!" We have left our homeland and entered the desert (literally). So, I wanted to focus on this aspect of the Parsha - on the journey. My first thought was to do something with footprints. I googled "footprints in sand craft" but all of the projects involved Plaster of Paris which intimidated me, especially since I have no idea what it is called in Hebrew! So, I decided to do something more basic and make painted footprints, something that is apparently done as an activity at baby showers (lefi google)!
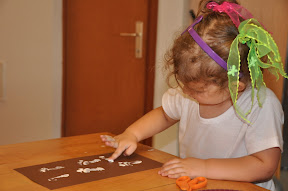
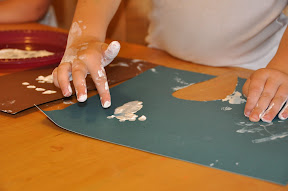
The girls were thrilled to do anything with paint since I am typically fearful of this art supply! They especially loved being able to paint their hands and get good and messy...
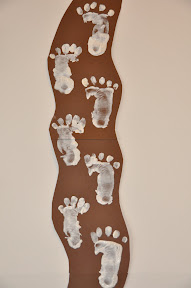
Although we enjoyed the footprints, I still think that STARS are a great theme from this week's parsha for kids. So, I wanted to come up with a new star project (even though my kids would be perfectly happy just gluing glitter all over the place). In flipping through this craft book that my mother-in-law gave me, I saw an idea for how to make a glitter globe. I LOVE glitter globes! Many glitter globes are really snow globes (made using smashed egg shell pieces, who knew?) so I decided that we would make a star globe instead. I went ahead and tried to make an example before the kids came home. The instructions called for "distilled water." I wasn't sure what that was but Andy said that we had lots of it from our dryer. Perfect. It also suggested adding a drop of glycerin. Again, I wasn't sure what that was but I was sure that we didn't have it so like in cooking, I just left it out. Then, I just added a bunch of big glitter pieces. The real problem was sealing the jar closed. I tried to hot glue gun it but it still leaks.
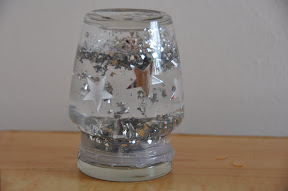
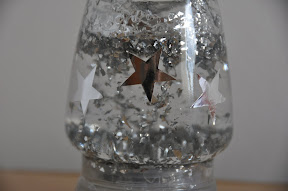
When Maya came home from school, she desperately wanted to make one too so Andy cleaned out a "schug" jar and we got to work.
Parshat Lech Lecha "take two".
Encountering the parshiot for a second time, I wasn't sure if I would just do the same projects again with the girls (which they would be perfectly fine with) or if I would "challenge" myself to go bigger and better. I still don't really know but I was motivated to come up with some new ideas for Parshat Lech Lecha.
Parshat Lech Lecha is particularly significant for us this year since it is our first living as a family in Israel. We have done "Lech Lecha!" We have left our homeland and entered the desert (literally). So, I wanted to focus on this aspect of the Parsha - on the journey. My first thought was to do something with footprints. I googled "footprints in sand craft" but all of the projects involved Plaster of Paris which intimidated me, especially since I have no idea what it is called in Hebrew! So, I decided to do something more basic and make painted footprints, something that is apparently done as an activity at baby showers (lefi google)!
The girls were thrilled to do anything with paint since I am typically fearful of this art supply! They especially loved being able to paint their hands and get good and messy...
Although we enjoyed the footprints, I still think that STARS are a great theme from this week's parsha for kids. So, I wanted to come up with a new star project (even though my kids would be perfectly happy just gluing glitter all over the place). In flipping through this craft book that my mother-in-law gave me, I saw an idea for how to make a glitter globe. I LOVE glitter globes! Many glitter globes are really snow globes (made using smashed egg shell pieces, who knew?) so I decided that we would make a star globe instead. I went ahead and tried to make an example before the kids came home. The instructions called for "distilled water." I wasn't sure what that was but Andy said that we had lots of it from our dryer. Perfect. It also suggested adding a drop of glycerin. Again, I wasn't sure what that was but I was sure that we didn't have it so like in cooking, I just left it out. Then, I just added a bunch of big glitter pieces. The real problem was sealing the jar closed. I tried to hot glue gun it but it still leaks.
When Maya came home from school, she desperately wanted to make one too so Andy cleaned out a "schug" jar and we got to work.
PARSHAT NOACH
RAINBOW NECKLACES AND COOKIES!
We have entered our second year of Parsha Projects. Last year, we started with Lecha Lecha so we missed the colorful opportunities that Parshat Noach provides! So many options for crafts - arks, doves, animals, water. But, I went with the most obvious - rainbows! First, I dyed one bag of pasta. It is so easy and comes out so beautiful! We now have a huge bag of colored pasta that we can use for all sorts of projects - jewelery, mosaics, etc.


Since the girls are pretty into beading, we first made rainbow necklaces:

We had so many noodles that we also made a rainbow just by gluing them onto a piece of cardboard...


As if we did not have enough rainbows around, I was determined to make rainbow cookies for Shabbos. Someone cited this recipe
on Challah Crumb's Facebook page and it looked easy and fun. The first step, dyeing the dough was definitely fun and easy:


But, when it came time to work with the dough, we were in trouble. The dough was just sticky and mushy. It was just a mess, a disaster, a flop. So, as often happens in times like this, Andy stepped in to try to save the day.

He froze the dough which helped a bit but it was still incredible frustrating to work with. We managed to put together some things that sort of looked like rainbows...


I was especially proud of this one that brought back San Francisco memories...

As always, what I considered to be a flop, the girls considered to be a masterpiece!
Perspective.


We have entered our second year of Parsha Projects. Last year, we started with Lecha Lecha so we missed the colorful opportunities that Parshat Noach provides! So many options for crafts - arks, doves, animals, water. But, I went with the most obvious - rainbows! First, I dyed one bag of pasta. It is so easy and comes out so beautiful! We now have a huge bag of colored pasta that we can use for all sorts of projects - jewelery, mosaics, etc.
Since the girls are pretty into beading, we first made rainbow necklaces:
We had so many noodles that we also made a rainbow just by gluing them onto a piece of cardboard...
As if we did not have enough rainbows around, I was determined to make rainbow cookies for Shabbos. Someone cited this recipe
on Challah Crumb's Facebook page and it looked easy and fun. The first step, dyeing the dough was definitely fun and easy:
But, when it came time to work with the dough, we were in trouble. The dough was just sticky and mushy. It was just a mess, a disaster, a flop. So, as often happens in times like this, Andy stepped in to try to save the day.
He froze the dough which helped a bit but it was still incredible frustrating to work with. We managed to put together some things that sort of looked like rainbows...
I was especially proud of this one that brought back San Francisco memories...
As always, what I considered to be a flop, the girls considered to be a masterpiece!
Perspective.
Friday, August 20, 2010
PARSHAT HAAZINU
ISRAEL DIORAMA
We are finally in our new home! And, more important, our "stuff" has arrived. And, along with our stuff came the hundreds of BOXES that it was packed in. Andy and I worked like maniacs to unpack everything with the goal of just getting everything OUT of the boxes.


In the midst of all of this, I still wanted to produce a parsha project - both for the girls and for Challah Crumbs. I knew that I wanted to focus on Moshe looking into the land of Israel but I was not sure how I wanted to depict this scene. It was Andy's idea - maybe inspired by the boxes around us - to make a diorama. I wasn't sure what a diorama was (or how to spell it) but I quickly found out that it is basically making any kind of scene using a box. Since I had plenty of those around (but not much else except some scrapbook paper), I got to work.
This is what I came up with...

I added a figure of Moshe looking into the land. The girls had fun folding Moses up and down, alternating between saying "Moses is dead" and "Moses is alive" -

The girls each made dioramas of their own but I let them do whatever they wanted which meant they made...princess castles. Oh well.
We are finally in our new home! And, more important, our "stuff" has arrived. And, along with our stuff came the hundreds of BOXES that it was packed in. Andy and I worked like maniacs to unpack everything with the goal of just getting everything OUT of the boxes.
In the midst of all of this, I still wanted to produce a parsha project - both for the girls and for Challah Crumbs. I knew that I wanted to focus on Moshe looking into the land of Israel but I was not sure how I wanted to depict this scene. It was Andy's idea - maybe inspired by the boxes around us - to make a diorama. I wasn't sure what a diorama was (or how to spell it) but I quickly found out that it is basically making any kind of scene using a box. Since I had plenty of those around (but not much else except some scrapbook paper), I got to work.
This is what I came up with...
I added a figure of Moshe looking into the land. The girls had fun folding Moses up and down, alternating between saying "Moses is dead" and "Moses is alive" -
The girls each made dioramas of their own but I let them do whatever they wanted which meant they made...princess castles. Oh well.
Saturday, August 7, 2010
Sunday, August 1, 2010
PARSHAT KI TETZEI
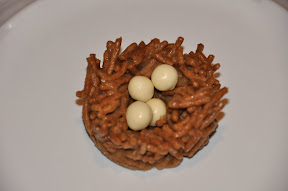
EDIBLE BIRDS NEST
This is our second week of trying to do Parsha Projects under less than ideal circumstances. First of all, it is crazy hot!!! More importantly, we are still unsettled, living out of suitcases, in someone else's space. But, this parsha presented a no-brainer in terms of subject matter. I knew that I wanted to do something with the beautiful mitzvah of "shiluah haken" or sending away the mother bird. I started google-imaging "birds nest craft" and came across the idea of an edible birds nest. There were a number of different versions. I knew the girls would love the kind that seemed to be a popular Easter treat - a bird nest cookie made with Chow Mein noodles. But, alas, no Chow Mein noodles easily accessible in Israel, at least not in the Gush. So, I had to come up with an alternative. I bought a bag of pretzel sticks but I was worried that they would be too thick. Then, in the cereal aisle, I saw bran cereal sticks - they were perfect!
We melted peanut butter and chocolate chips together and mixed in the bran sticks. Then, we just made balls, made an indentation with our fingers in the middle, and stuck them in the freezer to firm up.
At the supermarket, I pondered what to use for the eggs. Most recipes called for white jelly beans. Those were not easy to find around here. But, Israel had lots of alternatives in the candy section - I bought white mentos, tic tacs, and kliks - so we had lots of different tastes, sizes, and shapes of eggs!
Friday, July 30, 2010
PARSHAT SHOFTIM
HANDPRINT TREE
This is my first attempt to do a parsha project while living in someone else's house in Israel, without our stuff, feeling very unsettled. My connection to the internet is sketchy. I don't have any of my basic art supplies. And, I am not a car ride away from Michael's! But, thankfully, Israel does have a surprising number of little craft stores. At this point, I limited myself to buying some basic paper and paints. I don't even know what kind of paints I bought, if they are washable, etc, but we will use them outside and they will have to do.
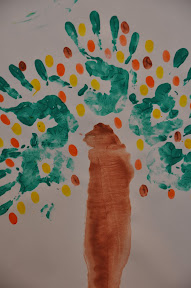
In this week's parsha, there is the prohibition against destroying fruit-bearing trees because "haadam etz hasadeh." We talked about how trees and people are alike and how we have to be kind to both. We made these pretty tree prints using our forearms, hands, and fingers.

On Shabbat, a bunch of kids were whacking a tree and Maya came over to me and whispered in my ear: "They are not being nice to the tree like it says in the Parsha." That's my little Goody Two-Shoes!
This is my first attempt to do a parsha project while living in someone else's house in Israel, without our stuff, feeling very unsettled. My connection to the internet is sketchy. I don't have any of my basic art supplies. And, I am not a car ride away from Michael's! But, thankfully, Israel does have a surprising number of little craft stores. At this point, I limited myself to buying some basic paper and paints. I don't even know what kind of paints I bought, if they are washable, etc, but we will use them outside and they will have to do.
In this week's parsha, there is the prohibition against destroying fruit-bearing trees because "haadam etz hasadeh." We talked about how trees and people are alike and how we have to be kind to both. We made these pretty tree prints using our forearms, hands, and fingers.
On Shabbat, a bunch of kids were whacking a tree and Maya came over to me and whispered in my ear: "They are not being nice to the tree like it says in the Parsha." That's my little Goody Two-Shoes!
Wednesday, July 21, 2010
Wednesday, July 14, 2010
PARSHAT MATOT-MASAI
COTTON BALL SHEEP
In an email to the editor of Challah Crumbs, I wrote "Parshat Matot stinks for kids crafts ideas…Ill see what I can come up with but I am not optimistic…" The parsha spends alot of time on vows and war and I was not very inspired. For preschoolers, I am looking for concrete objects like people, stars, food, clothing, or animals - especially animals. So, I looked again and I found...sheep! In Parshat Matot, the tribes of Reuven and Gad ask Moshe for the lands east of the Jordon so that they can have more land for their cattle. So, all I had to do was figure out how to make lots and lots of sheep!
Thankfully - yet again - not only do Christian Sunday School teachers love donkeys, they also love sheep (Jesus is the good shephard, the parable of the lost sheep..) Lamb crafts are especially popular for Easter time.
So, luckily, I had an easy time finding a sheep craft that used all stuff that we already had at home - toilet paper rolls and cotton balls. I wanted to do a model one for Challah Crumbs but I couldn't exactly remember what a sheep should look like. Andy reminded me of the image from the mattress commercials:

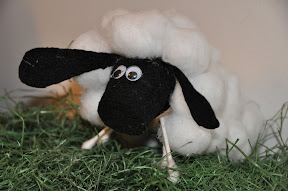
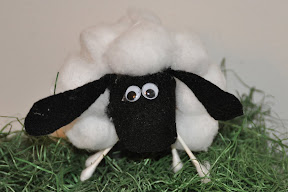
Our version came out super cute:
I used a mini-plastic kiddush wrapped in black felt for the nose. I have no idea why we had this grassy material in the house but it made for perfect pastureland...
In an email to the editor of Challah Crumbs, I wrote "Parshat Matot stinks for kids crafts ideas…Ill see what I can come up with but I am not optimistic…" The parsha spends alot of time on vows and war and I was not very inspired. For preschoolers, I am looking for concrete objects like people, stars, food, clothing, or animals - especially animals. So, I looked again and I found...sheep! In Parshat Matot, the tribes of Reuven and Gad ask Moshe for the lands east of the Jordon so that they can have more land for their cattle. So, all I had to do was figure out how to make lots and lots of sheep!
Thankfully - yet again - not only do Christian Sunday School teachers love donkeys, they also love sheep (Jesus is the good shephard, the parable of the lost sheep..) Lamb crafts are especially popular for Easter time.
So, luckily, I had an easy time finding a sheep craft that used all stuff that we already had at home - toilet paper rolls and cotton balls. I wanted to do a model one for Challah Crumbs but I couldn't exactly remember what a sheep should look like. Andy reminded me of the image from the mattress commercials:
Our version came out super cute:
I used a mini-plastic kiddush wrapped in black felt for the nose. I have no idea why we had this grassy material in the house but it made for perfect pastureland...
PARSHAT PINCHAS
DAUGHTERS OF TZELAFCHAD PAPER DOLL CHAIN
Since my "classroom" is made of two little girls- who also happen to be my daughters - it was a pretty easy decision for me to focus on the story of the Daughters of Tzelafchad narrated in this week's parsha.
I decided to do paper dolls again since they are easy and the girls just love doing dress-up doll things. This time though I decided to get some scraps of materials so that we could make them fancy skirts and dresses.
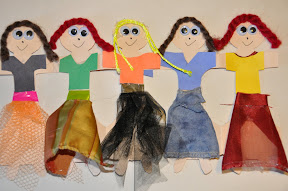
For some reason, Maya really enjoyed learning the names of the five girls - Machlah, No'ah, Chaglah, Milkah and Tirtzah. She decided which "doll" was which girl and we wrote their names on their backs. On a whim, I put a few pieces of magnet tape on the back of the dolls so now they hang on our fridge and we are reminded and inspired by their "feminist revolution!"
Since my "classroom" is made of two little girls- who also happen to be my daughters - it was a pretty easy decision for me to focus on the story of the Daughters of Tzelafchad narrated in this week's parsha.
I decided to do paper dolls again since they are easy and the girls just love doing dress-up doll things. This time though I decided to get some scraps of materials so that we could make them fancy skirts and dresses.
For some reason, Maya really enjoyed learning the names of the five girls - Machlah, No'ah, Chaglah, Milkah and Tirtzah. She decided which "doll" was which girl and we wrote their names on their backs. On a whim, I put a few pieces of magnet tape on the back of the dolls so now they hang on our fridge and we are reminded and inspired by their "feminist revolution!"
Thursday, July 1, 2010
PARSHAT BALAK
DONKEY PUPPET
We are big fans of this Parsha since Andy is its g-dcast narrator. Check it out! Needless to say, the girls have watched their father's cartoon numerous times so they know this parsha has something to do with a donkey.
Anyway, you can't NOT do a donkey craft for Parshat Balak! Thankfully, there were a million donkey craft ideas on the internet, thanks yet again, to the Christian Bible. Apparently, Christians are very into donkeys since Jesus apparently spent alot of time riding on one. There is even an entire website called Bible Donkeys.
Kids love talking animals and they love puppets so this seemed like the perfect opportunity for a good old-fashioned paper bag puppet. I think that he came out super cute. I would listen to what he had to say...
Friday, June 25, 2010
PARSHAT CHUKAT
PAPER PLATE SPIRAL SNAKES
Crafting a red heifer (or a parah adumah) seems like the most obvious idea from this week's parsha, especially after seeing Julie Seltzer's parah adumah challah! But, I couldn't imagine trying to explain the concepts of tumah and taharah as they relate to this ritual!
So, instead, we focused on another weird animal story in the parsha. Its short, so I will just quote the whole thing here:
The most obviously problematic aspect of this passage is that the copper snake seems kinda idolatrous-y, no? Well, apparently, as long as the command to fashion objects out of precious metals comes directly from God - like the Keruvim - then it is not avodah zara.
So, it was snakes for us instead of cows. I found this VERY easy and fun way to make snakes. All you need is a cheap paper plate. My original plan was to make just the copper snake but that didn't go so well. First of all, I didn't have any copper-colored anything. So, I used the leftover gold glitter paint that we had (close enough). But, I was impatient and didn't wait for it to dry so it was a big mess but you can get the idea...

Then I decided that this project was so easy that we should just make a whole bunch of snakes, poisonous and all. I realized that the easiest thing to do is to use markers when the paper plate is still intact and THEN cut it in a spiral shape. The results are really cute:


We made and hung lots of snakes and they are still up in our dining room. And, now I have a package of paper plates that are great for puppets, masks, etc.
I was very excited to see another "mama" do this parsha project over at Adventures in Mama-Land - yay!
Crafting a red heifer (or a parah adumah) seems like the most obvious idea from this week's parsha, especially after seeing Julie Seltzer's parah adumah challah! But, I couldn't imagine trying to explain the concepts of tumah and taharah as they relate to this ritual!
So, instead, we focused on another weird animal story in the parsha. Its short, so I will just quote the whole thing here:
And G-d sent poisonous snakes among the people, and they bit the nation, and many perished of the people of Israel. And the people came to Moshe, and they said, “we have sinned, because we spoke against G-d and against you; pray to G-d that He take away from us the snakes.” And Moshe prayed on behalf of the nation. And G-d said to Moshe, “make for yourself a snake and put it on a pole, and it will be that anyone bitten will see it, and live.” And Moshe made a copper snake (nachash nechoshet), and set it on a high pole, and it was that if a snake bit a man, and he stared at the copper snake, that he lived. Numbers 21:6-9
The most obviously problematic aspect of this passage is that the copper snake seems kinda idolatrous-y, no? Well, apparently, as long as the command to fashion objects out of precious metals comes directly from God - like the Keruvim - then it is not avodah zara.
So, it was snakes for us instead of cows. I found this VERY easy and fun way to make snakes. All you need is a cheap paper plate. My original plan was to make just the copper snake but that didn't go so well. First of all, I didn't have any copper-colored anything. So, I used the leftover gold glitter paint that we had (close enough). But, I was impatient and didn't wait for it to dry so it was a big mess but you can get the idea...
Then I decided that this project was so easy that we should just make a whole bunch of snakes, poisonous and all. I realized that the easiest thing to do is to use markers when the paper plate is still intact and THEN cut it in a spiral shape. The results are really cute:
We made and hung lots of snakes and they are still up in our dining room. And, now I have a package of paper plates that are great for puppets, masks, etc.
I was very excited to see another "mama" do this parsha project over at Adventures in Mama-Land - yay!
PARSHAT KORACH
AARON'S BLOSSOMING STAFF
Yes, I am a little behind schedule. But, it is not because we haven't been doing Parsha Projects around here. Lehefech - just the opposite. We have been all Parsha, all the time. Between working for g-dcast and helping out at Challah Crumbs, there seems to be only so much time I can dedicate to thinking, writing, and crafting about the Parsha. So, actually working with my own kids on Parsha has suffered a bit - mainly in my taking the time to photograph their works in progress, which of course I think is the best part of this blog!
My first idea for this week's parsha was to somehow recreate the earth swallowing up Korach and his followers. Some kind of volcano or earthquake science project? But, I decided (once again) that this wasn't one of the narratives I was jumping to tell my kids.
So, instead I focuses on a brief episode in the Parsha in which Aaron's rod of staff, representing the holy tribe of Levi, "puts forth buds, produced blossoms, and bore ripe almonds (Bamidbar 17:8). My kids already think of staffs as very biblical objects - they associate them with Pharaoh and Moses.
Making the staff was SUPER easy. I just used electrical tape to wrap two paper towel rolls and attach them together:

Then, I glued on pink tissue paper flowers and leaf and almond shapes cut out of foam paper.


It came out very pretty and it now lives in the playroom where the girls use it in various forms of dress-up and make believe.
In retrospect, I might have chosen to use real leaves, flowers, and almonds to decorate the rod. That certainly would have expanded the project since we could have spent time collecting these things outside. But, on the other hand, such a project would have been trashed by now...
Yes, I am a little behind schedule. But, it is not because we haven't been doing Parsha Projects around here. Lehefech - just the opposite. We have been all Parsha, all the time. Between working for g-dcast and helping out at Challah Crumbs, there seems to be only so much time I can dedicate to thinking, writing, and crafting about the Parsha. So, actually working with my own kids on Parsha has suffered a bit - mainly in my taking the time to photograph their works in progress, which of course I think is the best part of this blog!
My first idea for this week's parsha was to somehow recreate the earth swallowing up Korach and his followers. Some kind of volcano or earthquake science project? But, I decided (once again) that this wasn't one of the narratives I was jumping to tell my kids.
So, instead I focuses on a brief episode in the Parsha in which Aaron's rod of staff, representing the holy tribe of Levi, "puts forth buds, produced blossoms, and bore ripe almonds (Bamidbar 17:8). My kids already think of staffs as very biblical objects - they associate them with Pharaoh and Moses.
Making the staff was SUPER easy. I just used electrical tape to wrap two paper towel rolls and attach them together:
Then, I glued on pink tissue paper flowers and leaf and almond shapes cut out of foam paper.
It came out very pretty and it now lives in the playroom where the girls use it in various forms of dress-up and make believe.
In retrospect, I might have chosen to use real leaves, flowers, and almonds to decorate the rod. That certainly would have expanded the project since we could have spent time collecting these things outside. But, on the other hand, such a project would have been trashed by now...
Subscribe to:
Posts (Atom)